Vault of the Beamcasters: Two Vaults, Stage by Stage
Match your entrance before choosing a vault. Follow the first route through the wrist-device chamber and egg chamber, or the second through the torc chamber and return to its entrance. Each stage includes pictures, a state check and an original-video link.
Based on the attributed P8 recording. Its exact game build is unknown; this site has not reproduced either route in the current version. Follow the pictured starting states. This is not a recovery guide for an arbitrarily changed save.
Use the entrance pictures and room layout, rather than another website's Level 1/2 labels. Left, right, up and down below refer to the matching top-down picture, not independently verified world compass directions. Video timestamps identify source footage; they are not waiting instructions.
Locate Vault of the Beamcasters on the world map →Circles locate objects in this picture. Source time is evidence location, not a waiting duration.
Vault A: wrist device and egg chamber
Choose the first courtyard with VAULT / BEAMCASTERS lettering. The filmed route enters a warm-coloured upper layout, visits a darker lower layout and returns to the upper layout before the egg chamber.
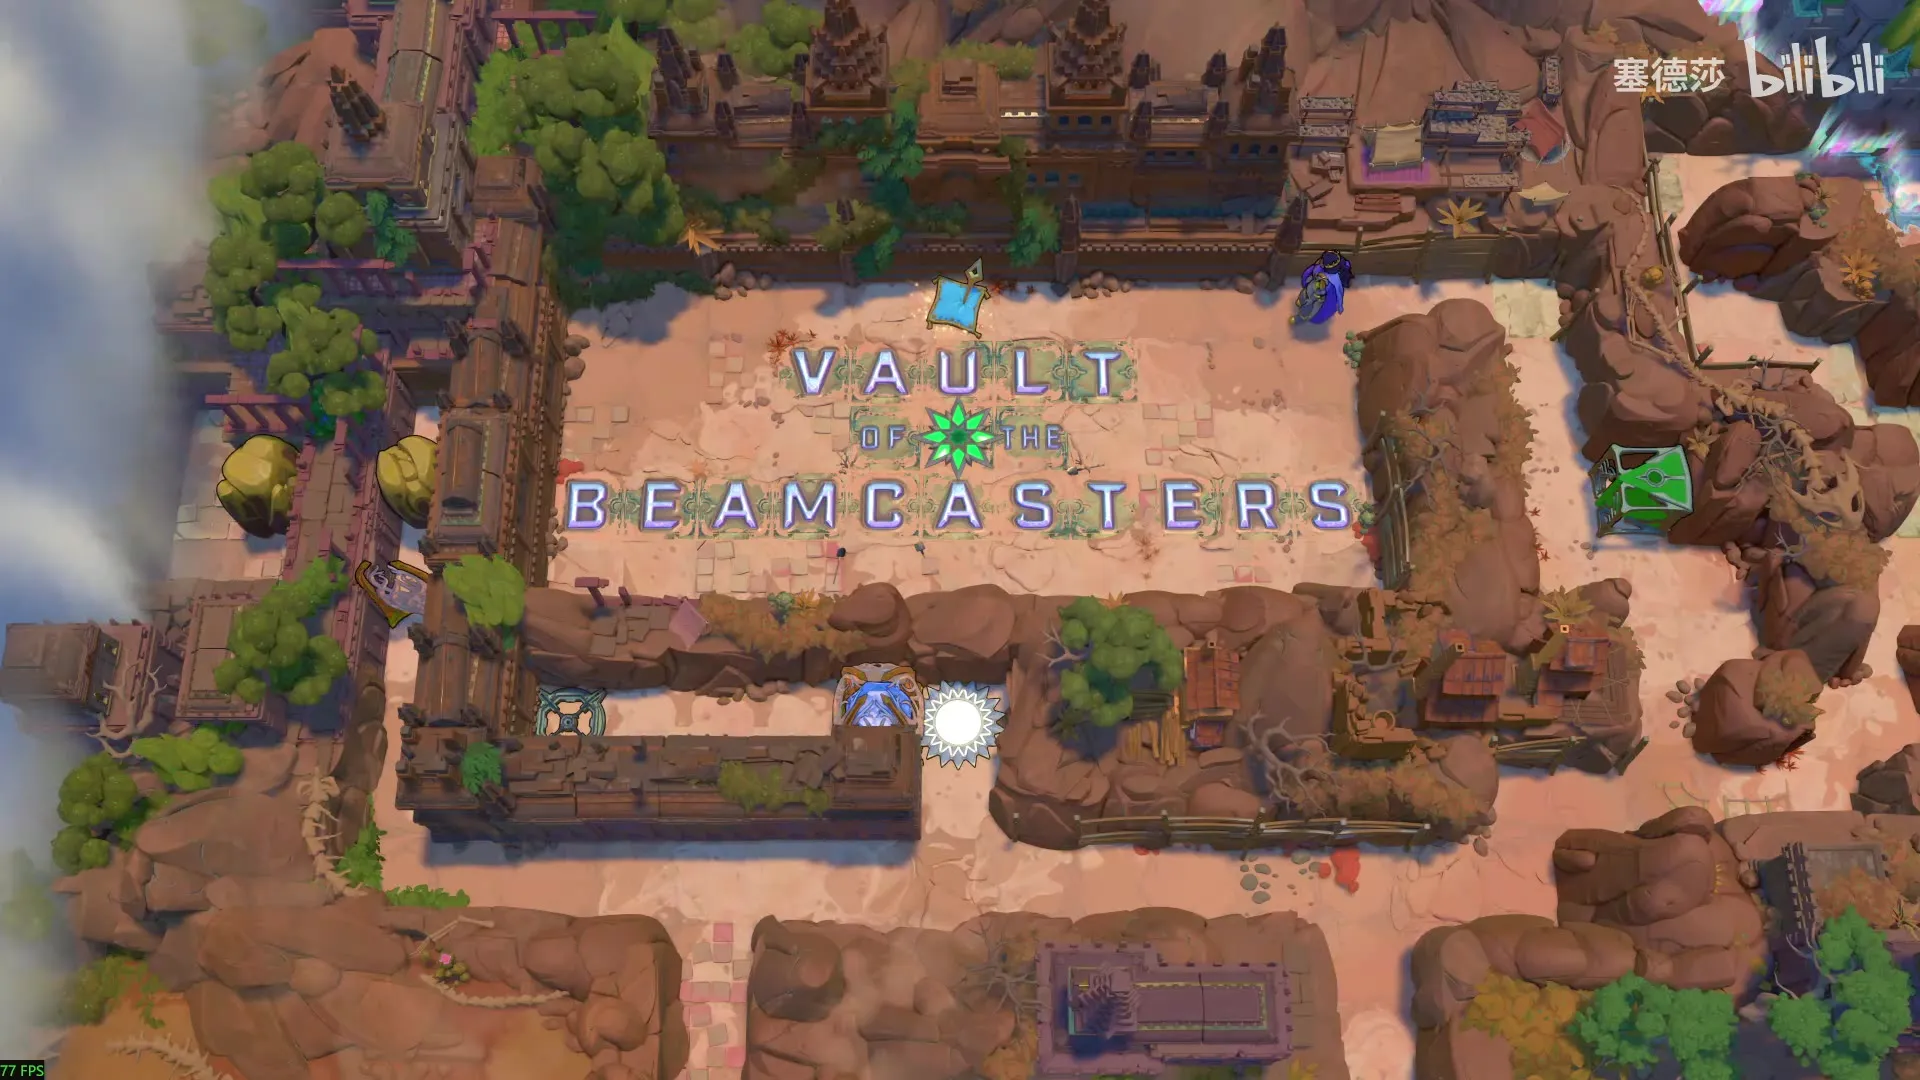
Before following the route
A light hint
A beamcaster used to open a route is not necessarily meant to stay powered forever. Compare the later return states before assuming a socketed gem is permanently spent.
What changes during this route
Keep temporary socket gems available for the next room. The wrist device acquired in this vault moves rocks and casters in straight lines; it is distinct from the caster-turning torc acquired in Vault B. Map wrap and camera changes can show the same room twice.
Start from the matching pictured layout. A different save state may need a different preparation or recovery route.
-
1 Activate the yellow chamber and clear the corridor
00:47–01:40Stage checkpointWait for the blocker to reach the pictured part of its track. Both the blocker and the left rock disappear in the demonstrated sequence.
-
1.1 Collect G1 beside the cyan caster
Before the move · P8 00:47 Watch P8 · 00:47–00:58 ↗DoIn the upper starting rooms, follow the corridor right of the three-rock yellow chamber. Collect the blue gem G1 immediately below the downward-facing cyan caster.
Wait / checkUse the collect interaction. Leave the separate gem beyond the wall to the right for later.
You should seeG1 disappears from this tile and is available to place in a socket.
-
1.2 Put G1 in the yellow-room socket
Before the move · P8 00:58 Watch P8 · 00:58–01:04 ↗DoReturn left to the three-rock chamber. Walk around the right side of the rocks and place G1 in socket S1 at the upper-right.
Wait / checkThe yellow caster Y1 must light up, with a downward beam on the left side of the room.
You should seeS1 contains the gem, and the yellow beam reaches the leftmost rock.
-
1.3 Clear the three rocks from the yellow beam
Before clearing — numbered targets · P8 01:07 Watch P8 · 01:07–01:22 ↗DoEnter the yellow beam from the open top row. Move into the rock below you first, then the rock to the right, then the remaining lower-right rock.
Wait / checkStay on the yellow-lit side while clearing the rocks. Check each rock disappears; the blue patterned floor becomes visible behind them.
You should seeAll three rocks are gone and the room’s lower passage is open.
-
1.4 Clear the moving blocker and the rock beside it
Target position — moving blocker · P8 01:34 Watch P8 · 01:29–01:40 ↗DoFollow the corridor down to the yellow column. Step into the yellow light beside the moving grey blocker and clear it, then clear the rock immediately to its left.
Wait / checkWait for the blocker to reach the pictured part of its track. Both the blocker and the left rock disappear in the demonstrated sequence.
You should seeThe horizontal corridor is clear. The yellow beam extends farther down.
-
-
2 Recover gems and clear the red passage
01:40–02:35Stage checkpointCheck the red barrier tile becomes clear and stays clear after you take the gem back.
-
2.1 Take G1 back before leaving
Return route — socket still powered · P8 01:41 Watch P8 · 01:40–01:43 ↗DoReturn to S1 in the upper yellow chamber and retrieve its gem.
Wait / checkThe cleared rocks stay absent while the yellow beam switches off.
You should seeG1 is available for the next room.
-
2.2 Power the lower-left cyan room
Before powering the room · P8 01:50 Watch P8 · 01:43–01:55 ↗DoTake the long corridor down the left side of the red-gated room. Place G1 in S2, immediately above the right-facing cyan caster.
Wait / checkThe cyan beam points right into the first rock. Do not put the gem in the red socket above this room yet.
You should seeThe cyan room is powered; the loose gem G2 remains at its lower-right corner.
-
2.3 Push the rock along the cyan beam
Before the move · P8 02:05 Watch P8 · 02:05–02:12 ↗DoStand in the cyan beam to the left of the blocking rock and push it right along the row until the passage below is accessible.
Wait / checkThe second rock below the row stays in place. The earlier pause and undo are not an extra required move.
You should seeThe first rock is at the right end of the row; you can go down around the second rock to G2.
-
2.4 Collect G2 and reclaim G1
After the rock move · P8 02:12 Watch P8 · 02:12–02:16 ↗DoCollect G2 at the lower-right, then retrace the open route to S2 and take G1 back.
Wait / checkThe inventory now has two gems and S2 is empty. Keep the moved rock at the right end.
You should seeYou can leave the cyan room carrying both gems.
-
2.5 Power the red caster in the central room
Before the move · P8 02:18 Watch P8 · 02:18–02:25 ↗DoReturn up the main corridor, then enter the central red-caster room from above. Place one gem in S3 at its lower-right.
Wait / checkThe red caster sends a horizontal beam to the right. The red barrier below its far end is still visible.
You should seeOne gem remains available while S3 powers the red beam.
-
2.6 Leave through the red passage
Powered exit · P8 02:25 Watch P8 · 02:25–02:35 ↗DoWalk around the room’s top-right corner, enter the red beam at its far end and move down into the red barrier. Then return to S3 and retrieve its gem before leaving by the cleared opening.
Wait / checkCheck the red barrier tile becomes clear and stays clear after you take the gem back.
You should seeThe green-caster room becomes reachable below and to the right.
-
-
3 Connect the lower green and yellow branches
02:35–03:25Stage checkpointKeep S7 powered for the later circuit. Return right along the corridor below the red caster.
-
3.1 Power the green route to the right
Before the move · P8 02:35 Watch P8 · 02:35–02:48 ↗DoPlace a gem in S4, above the right-facing green caster. Step into its beam and follow it right into the vertical corridor.
Wait / checkKeep S4 powered when you turn down. The rock at the far end still stops the green beam.
You should seeYou can go down to the yellow room.
-
3.2 Power the upward yellow caster
Before the move · P8 02:48 Watch P8 · 02:48–02:50 ↗DoContinue down the right corridor and place your other gem in S5. Enter the yellow beam from beside the caster.
Wait / checkKeep the green socket above powered. The yellow beam points upward through the same corridor.
You should seeYellow light reaches the rock blocking the green row above.
-
3.3 Clear the crossing and the left-hand rocks
Before the move · P8 02:50 Watch P8 · 02:50–02:55 ↗DoFrom the yellow column clear the rock on the green row, then clear the rocks along the left side of the yellow column until the bottom cross-corridor opens.
Wait / checkCheck the green beam now continues right. Leave the lower rock outside the opening in place.
You should seeA route to the left-facing green room opens at the lower junction.
-
3.4 Transfer the yellow gem to the left green room
Before the move · P8 02:57 Watch P8 · 02:56–03:00 ↗DoRetrieve the gem from S5. Walk left through the cleared cross-corridor and put it in S6, above the left-facing green caster.
Wait / checkThe yellow beam switches off; the new green beam points left. The first green route above stays powered.
You should seeThe left green room is ready for its gem pickup.
-
3.5 Collect the gem below the left green beam
Before the move · P8 03:00 Watch P8 · 03:00–03:13 ↗DoEnter the left-facing green beam and pass the moving grey blocker. Go below the beam to collect the loose gem at its left end, then return to S6 and retrieve its gem.
Wait / checkThe loose gem must disappear from below the rock. Do not mistake the moving grey blocker for a socket.
You should seeS6 is empty and you can leave this room carrying the recovered gem and the pickup.
-
3.6 Open the vertical red passage on the left
Before the move · P8 03:17 Watch P8 · 03:13–03:25 ↗DoFollow the cross-corridor left. Put a gem in S7 beside the upward red caster, enter the red line and clear the barrier above it.
Wait / checkKeep S7 powered for the later circuit. Return right along the corridor below the red caster.
You should seeThe vertical red line is active and the upper barrier has disappeared.
-
-
4 Extend into the right-hand side room
03:25–03:59Stage checkpointThe cyan beams switch off while the original green beam stays on. R3 remains at the top-right.
-
4.1 Power the cyan corner room
Before the move · P8 03:38 Watch P8 · 03:25–03:40 ↗DoFollow the original green line right into the side room. Put a gem in S8 beside the upward cyan caster.
Wait / checkThe orange rock still blocks the green line at the right edge. Both cyan casters share this room.
You should seeA cyan vertical beam reaches the rock from below.
-
4.2 Push R3 up to the upper cyan row
Before the move · P8 03:40 Watch P8 · 03:40–03:46 ↗DoEnter the upward cyan beam below R3 and push the rock up to the top row.
Wait / checkStop when the rock meets the horizontal cyan beam. Do not move it down into the green row again.
You should seeThe long green beam can continue through this room.
-
4.3 Collect the corner gem and take S8 back
Before the move · P8 03:46 Watch P8 · 03:46–03:59 ↗DoWalk around the open upper side and collect the loose gem in the middle of the room. Return to S8 and retrieve its gem.
Wait / checkThe cyan beams switch off while the original green beam stays on. R3 remains at the top-right.
You should seeThe corner pickup is gone and the long green route is clear.
-
-
5 Clear the upper yellow corridor
03:59–04:35Stage checkpointThe yellow caster below-right points left across the main corridor. Keep Y2 powered below.
-
5.1 Power Y2 again for the upper corridor
Before the move · P8 04:20 Watch P8 · 03:59–04:20 ↗DoReturn along the green route to the corridor beside Y2. Put a gem back in S5 and walk upward beside the yellow column.
Wait / checkThe right vertical yellow beam must be on. The red and green routes remain powered.
You should seeYou can approach the blocked corridor above the green crossing.
-
5.2 Clear the two rocks and moving blocker
Before the move · P8 04:20 Watch P8 · 04:20–04:29 ↗DoFrom the yellow column clear the two rocks along its left side, then the moving grey blocker below them. Collect the gem immediately to the blocker’s left.
Wait / checkCheck the two rock tiles and the moving blocker’s track are clear. The two rocks in the separate horizontal room above remain for later.
You should seeThe gem beside this vertical track disappears and the upper passage is accessible.
-
5.3 Power the left-facing yellow caster
Before the move · P8 04:30 Watch P8 · 04:29–04:35 ↗DoWalk right into the room above the cyan corner. Place a gem in S9 on its upper-left tile.
Wait / checkThe yellow caster below-right points left across the main corridor. Keep Y2 powered below.
You should seeA horizontal yellow line crosses the existing vertical yellow line.
-
-
6 Collect the upper red and central yellow pockets
04:35–06:10Stage checkpointThe central yellow column switches off; the right vertical and upper horizontal yellow lines remain on.
-
6.1 Collect the gem behind the upper red barrier
Before the move · P8 05:15 Watch P8 · 04:35–05:26 ↗DoReturn left along the horizontal corridor. Enter the still-powered vertical red beam, then move left through the red barrier and collect the gem behind it.
Wait / checkThe red barrier at the left end becomes an empty red outline. Leave the separate horizontal room above for the return visit.
You should seeThe loose gem on the left side of the red barrier is gone.
-
6.2 Retrieve S7 and return to the first yellow room
Before the move · P8 05:30 Watch P8 · 05:26–05:47 ↗DoGo down to the left red caster and take the gem back from S7. Return up the main corridor to the first yellow chamber and put a gem in S1.
Wait / checkThe old red line turns off. The first yellow caster points down through the cleared central corridor.
You should seeYou can use the central yellow line to reach the remaining two gem pockets.
-
6.3 Clear the two central gem pockets
Before the move · P8 05:50 Watch P8 · 05:47–05:59 ↗DoEnter the central downward yellow line. Collect the upper pocket gem and clear the adjacent rock along the yellow line; continue down to clear the lower rock and collect the gem to its left.
Wait / checkThe upper pocket lies above the red caster. The lower pocket lies above-right of S7.
You should seeBoth pocket gems and both blocking rocks are gone.
-
6.4 Take the first yellow gem back
Before the move · P8 06:00 Watch P8 · 05:59–06:10 ↗DoReturn up the cleared central corridor to S1 and retrieve its gem.
Wait / checkThe central yellow column switches off; the right vertical and upper horizontal yellow lines remain on.
You should seeYou have the gem available for the upper cyan room.
-
-
7 Use cyan and recover the upper-room sockets
06:10–06:58Stage checkpointThe upper yellow and cyan lines turn off first; the long green line turns off last. Do not remove S4 before you have returned from the far side.
-
7.1 Power the upper cyan and mixed-colour rooms
Before the move · P8 06:16 Watch P8 · 06:10–06:19 ↗DoPut a gem in the socket beside the downward cyan caster. Then use the socket in the adjacent room to its right, below the right-facing yellow caster.
Wait / checkThe long cyan column points downward. The adjacent yellow and green casters face each other across the upper row.
You should seeThe cyan column reaches the lower rock while the upper mixed-colour row is ready.
-
7.2 Recover S5 and clear the lower gem access
Rock at the lower stop · P8 06:20 Watch P8 · 06:19–06:24 ↗DoReturn down the right corridor and retrieve S5. Enter the cyan column above the lower rock and push the rock down out of the gem’s row. Collect the gem to the left.
Wait / checkThe right yellow column is now off. Keep the cyan column on until you are back out of the pocket.
You should seeThe gem beside the lower rock is gone.
-
7.3 Fill both upper sockets
First socket filled; second beside the hero · P8 06:30 Watch P8 · 06:24–06:35 ↗DoReturn up the right corridor and follow the mixed-colour row to its right end. Go up to the two adjacent sockets and fill both.
Wait / checkThese two blue objects are socketed gems, not two free pickups. The room outline lights up when the pair is filled.
You should seeThe upper room containing the moving blocker and loose gem is active.
-
7.4 Clear the blocker and recover the pair
Before the move · P8 06:35 Watch P8 · 06:35–06:41 ↗DoEnter the powered row beneath the moving grey blocker, clear the blocker and collect the loose gem to its left. Return to the upper pair and retrieve both socketed gems.
Wait / checkThe grey blocker leaves a pale cleared tile. Both upper sockets are empty when you leave.
You should seeThe blocker and loose gem are gone, and the two temporary gems are recovered.
-
7.5 Recover the remaining powered-room gems
Before the move · P8 06:43 Watch P8 · 06:41–06:58 ↗DoOn the way back down, retrieve the mixed-room gem, S9 and the cyan-room gem. Finally recover S4 above the original green caster before returning to the starting tiled chamber.
Wait / checkThe upper yellow and cyan lines turn off first; the long green line turns off last. Do not remove S4 before you have returned from the far side.
You should seeThe warm floor is unpowered and you can continue into the tiled chamber.
-
-
8 Open the ring chamber and collect the wrist device
06:58–07:35Stage checkpointConfirm the item pickup and the new device-use prompt before entering the corridor below. Keep this room powered for now.
-
8.1 Fill the ring to open the red exit
Perimeter partly filled · P8 07:10 Watch P8 · 06:58–07:21 ↗DoFrom the starting tiled chamber, enter the darker floor and fill every socket around the small red-caster chamber. Enter the powered red line and pass down through the red barrier.
Wait / checkThe barrier must become an empty red outline. Return around the ring and recover the socketed gems after opening it.
You should seeThe lower room is accessible and the ring is empty again.
-
8.2 Power the yellow room and collect the wrist device
Pickup effect and item location · P8 07:25 Watch P8 · 07:21–07:35 ↗DoPut a gem in the socket above the yellow caster. Enter its lit area and move down into the gold-floored chamber to collect the white wrist device.
Wait / checkConfirm the item pickup and the new device-use prompt before entering the corridor below. Keep this room powered for now.
You should seeThe device is no longer on the gold floor and its use prompt becomes available.
-
-
9 Push the corridor rocks into their stopping places
07:35–09:25Stage checkpointThe lower rock in the other spur stays in place. Follow the open corridor around the gold-edged central enclosure afterward.
-
9.1 Send the first corridor rock downward
Before the move · P8 07:40 Watch P8 · 07:35–08:10 ↗DoStand above the first rock below the gold room and use the wrist device facing down. Continue only after the rock has moved out of the walking turn.
Wait / checkThe source repeats the prompt before using it; the pause is not a required delay.
You should seeThe first rock is in the lower left recess and the corridor turn is open.
-
9.2 Drive the next rock down the right-hand passage
Before the move · P8 08:10 Watch P8 · 08:10–08:26 ↗DoGo around the turn to stand above the second rock. Use the wrist device facing down to advance it along the narrow right-hand passage; follow it and use the device again at the next stop.
Wait / checkKeep the rock in the right-hand column and stop when it reaches the bottom bend.
You should seeThe route down is open, with the rock at the bottom bend.
-
9.3 Send the bottom rock into the right recess
Position before the rightward use · P8 08:50 Watch P8 · 08:26–08:59 ↗DoFollow the corridor down. Stand immediately left of the bottom rock and use the wrist device facing right.
Wait / checkThe rock travels right out of the passage. The close-up is the same lower bend, not a new room.
You should seeYou can walk down and right into the next room.
-
9.4 Clear the rock beside the next gem
Before the move · P8 09:00 Watch P8 · 08:59–09:25 ↗DoEnter the lower room and stand to the left of the rock beside its loose gem. Use the wrist device to send the rock right, then collect the gem.
Wait / checkThe lower rock in the other spur stays in place. Follow the open corridor around the gold-edged central enclosure afterward.
You should seeThe gem is gone and the lower layout opens into view.
-
-
10 Work the lower green and cyan branch
09:25–10:36Stage checkpointLeave the middle rock where it stopped. The green line turns off after the pair is emptied.
-
10.1 Clear the cyan pocket beside the gold chamber
Rock moving right · P8 09:55 Watch P8 · 09:25–10:03 ↗DoGo to the cyan caster below-left of the gold chamber and fill its socket. Enter the cyan beam, stand left of the blocking rock and use the wrist device to send it right. Collect the gem below the cleared row, then recover the socket gem.
Wait / checkUse the gold chamber as the landmark. The rock stops to its left, clear of your walking row.
You should seeThe loose gem is gone and the cyan socket is empty again.
-
10.2 Use both sockets in the green room above
Both sockets filled · P8 10:20 Watch P8 · 10:03–10:28 ↗DoReturn to the room above the gold chamber. Use the wrist device to clear access beside its middle rock, collect the loose gem and fill both sockets on the room’s right side.
Wait / checkThe green caster points down and the room outline lights up. Keep both sockets filled while going up the green side.
You should seeYou can reach the upper side of the remaining rock.
-
10.3 Send the upper rock left and recover the pair
Before the move · P8 10:28 Watch P8 · 10:28–10:36 ↗DoFrom the green side, stand to the right of the upper rock and use the wrist device facing left. Return to both sockets and recover their gems.
Wait / checkLeave the middle rock where it stopped. The green line turns off after the pair is emptied.
You should seeThe upper rock is at the far-left end of its row and the room’s gems are recovered.
-
-
11 Use the yellow line, then return upstairs
10:36–11:45Stage checkpointThe red barrier becomes an empty outline and the loose gem disappears. Return via the tiled entrance on the upper-right.
-
11.1 Power the horizontal yellow room above
Before the move · P8 10:40 Watch P8 · 10:36–10:49 ↗DoGo up to the yellow caster above the green room and put a gem in the socket below-left of it. Work from the yellow row to clear its right-hand obstruction.
Wait / checkThe yellow beam must extend right past the gold room. Leave the displaced rock above the row alone.
You should seeThe horizontal yellow route is open.
-
11.2 Clear the left rock and the moving blocker
Before the move · P8 10:50 Watch P8 · 10:49–11:15 ↗DoFrom the powered yellow row, clear the rock to the left of the caster. Use the wrist device to move the grey blocker out of the upper-left pocket and collect the loose gem there. Then retrieve the yellow-room gem.
Wait / checkCheck the upper-left loose gem disappears. The moving grey object is an obstacle, not the socket below the caster.
You should seeThe pocket is empty and the yellow beam is off.
-
11.3 Move the red caster along the upper passage
Before the move · P8 11:18 Watch P8 · 11:15–11:25 ↗DoReturn to the red caster above the ring chamber. Stand on its right and use the wrist device to move it left along the top passage. Go around to the socket below-left of its new position.
Wait / checkThe caster keeps pointing down; this move changes its position rather than rotating it.
You should seeThe red caster is above the final red-gated gem pocket.
-
11.4 Clear the final red-gated pocket
Before the move · P8 11:25 Watch P8 · 11:25–11:45 ↗DoPower the relocated red caster from the socket below-left. Move the rock in its column to the right with the wrist device, then enter the red beam and clear the barrier beside the loose gem. Collect the gem and retrieve the socket gem.
Wait / checkThe red barrier becomes an empty outline and the loose gem disappears. Return via the tiled entrance on the upper-right.
You should seeThe source returns to the warm-coloured floor carrying the recovered gems.
-
-
12 Reclaim the upper-floor gems on the return circuit
11:45–13:28Stage checkpointThe final barrier is an empty outline. Both lower beams are off after recovering S2.
-
12.1 Use the wrist device in the previously hidden pocket
Downward use beside the pocket · P8 11:55 Watch P8 · 11:45–12:08 ↗DoBack on the warm floor, take the upper-left side passage beside the starting chamber. Use the wrist device to move the grey blocker out of the gem pocket, then collect the loose gem.
Wait / checkThe loose gem is below the top passage. Keep the separate rock on the upper-right ledge in place.
You should seeThe pocket gem is gone and the grey blocker remains in its lower track.
-
12.2 Restore the three lower beams
Before the move · P8 12:15 Watch P8 · 12:08–12:18 ↗DoReturn down to the bottom circuit. Power the lower-left cyan room, the left-facing green room and Y2 from their existing sockets.
Wait / checkCheck the cyan line faces right, the green line faces left and Y2 faces up. These are the same rooms visited earlier.
You should seeThe lower line is ready for moving the green caster.
-
12.3 Move the green caster right and collect below it
Before the move · P8 12:18 Watch P8 · 12:18–12:52 ↗DoStand to the left of the green caster and use the wrist device facing right. Follow its green row to reach the loose gem below the caster’s former position, then return to the sockets.
Wait / checkThe caster still faces left at its new position. Collect the loose gem before recovering S6 and S5; keep S2 powered for the final red route.
You should seeThe gem beneath the former caster tile is gone. Cyan remains on while green and yellow switch off.
-
12.4 Bring the final red caster down to the cyan row
Downward move in progress · P8 12:55 Watch P8 · 12:52–13:10 ↗DoEnter the newly revealed red room below the right cyan corner. Use the wrist device to move its red caster down, then right along the bottom row until it stops beside the powered cyan caster.
Wait / checkIt must still face left. Its red beam should run left across the red barrier’s room.
You should seeThe final red barrier is reachable from the powered red row.
-
12.5 Take the last gem and recover the cyan socket
Before the move · P8 13:10 Watch P8 · 13:10–13:28 ↗DoEnter the red beam, clear the barrier below the row and collect the gem beyond it. Return to the still-powered cyan room and retrieve S2. Then return through the starting chamber to the darker floor.
Wait / checkThe final barrier is an empty outline. Both lower beams are off after recovering S2.
You should seeThe recorded route leaves the warm floor for the large gold-ringed egg chamber.
-
-
13 Check the egg chamber's actual finish
13:28–14:00Stage checkpointThe perimeter is filled and the original egg has changed; the character is still on the perimeter during this cue. No separate walk onto the central egg is required by these frames.
-
13.1 Finish filling the gold perimeter
Top row still incomplete · P8 13:40 Watch P8 · 13:28–13:47 ↗DoReturn to the large gold-ringed chamber. Walk around its perimeter and fill every remaining socket, including the unfilled ones along the top edge.
Wait / checkThe egg is still present while sockets remain empty. Do not stop after filling only the side and bottom rows.
You should seeWith the perimeter filled, the central object changes and the exit sequence follows.
-
13.2 Check the central change before leaving
Completion cue · P8 13:47 Watch P8 · 13:47–14:00 ↗DoCheck the changed central object and follow the exit transition back to the lettered courtyard.
Wait / checkThe perimeter is filled and the original egg has changed; the character is still on the perimeter during this cue. No separate walk onto the central egg is required by these frames.
You should seeThe next scene returns outside, completing this recorded vault route.
-
Check the observed outcome
Fill the gold perimeter: the central egg-like object changes at about 13:47 while the hero is still on the perimeter. The footage then returns outside. No separate interaction on the central egg is demonstrated, and no Steam achievement or current-build guarantee is inferred.
Vault B: torc and return to the entrance
Choose the next exterior enclosure with a green beam across its lower half and a yellow line at its left. Inside, the route uses a grey-blue multi-room layout, obtains a torc below it and revisits the earlier rooms.
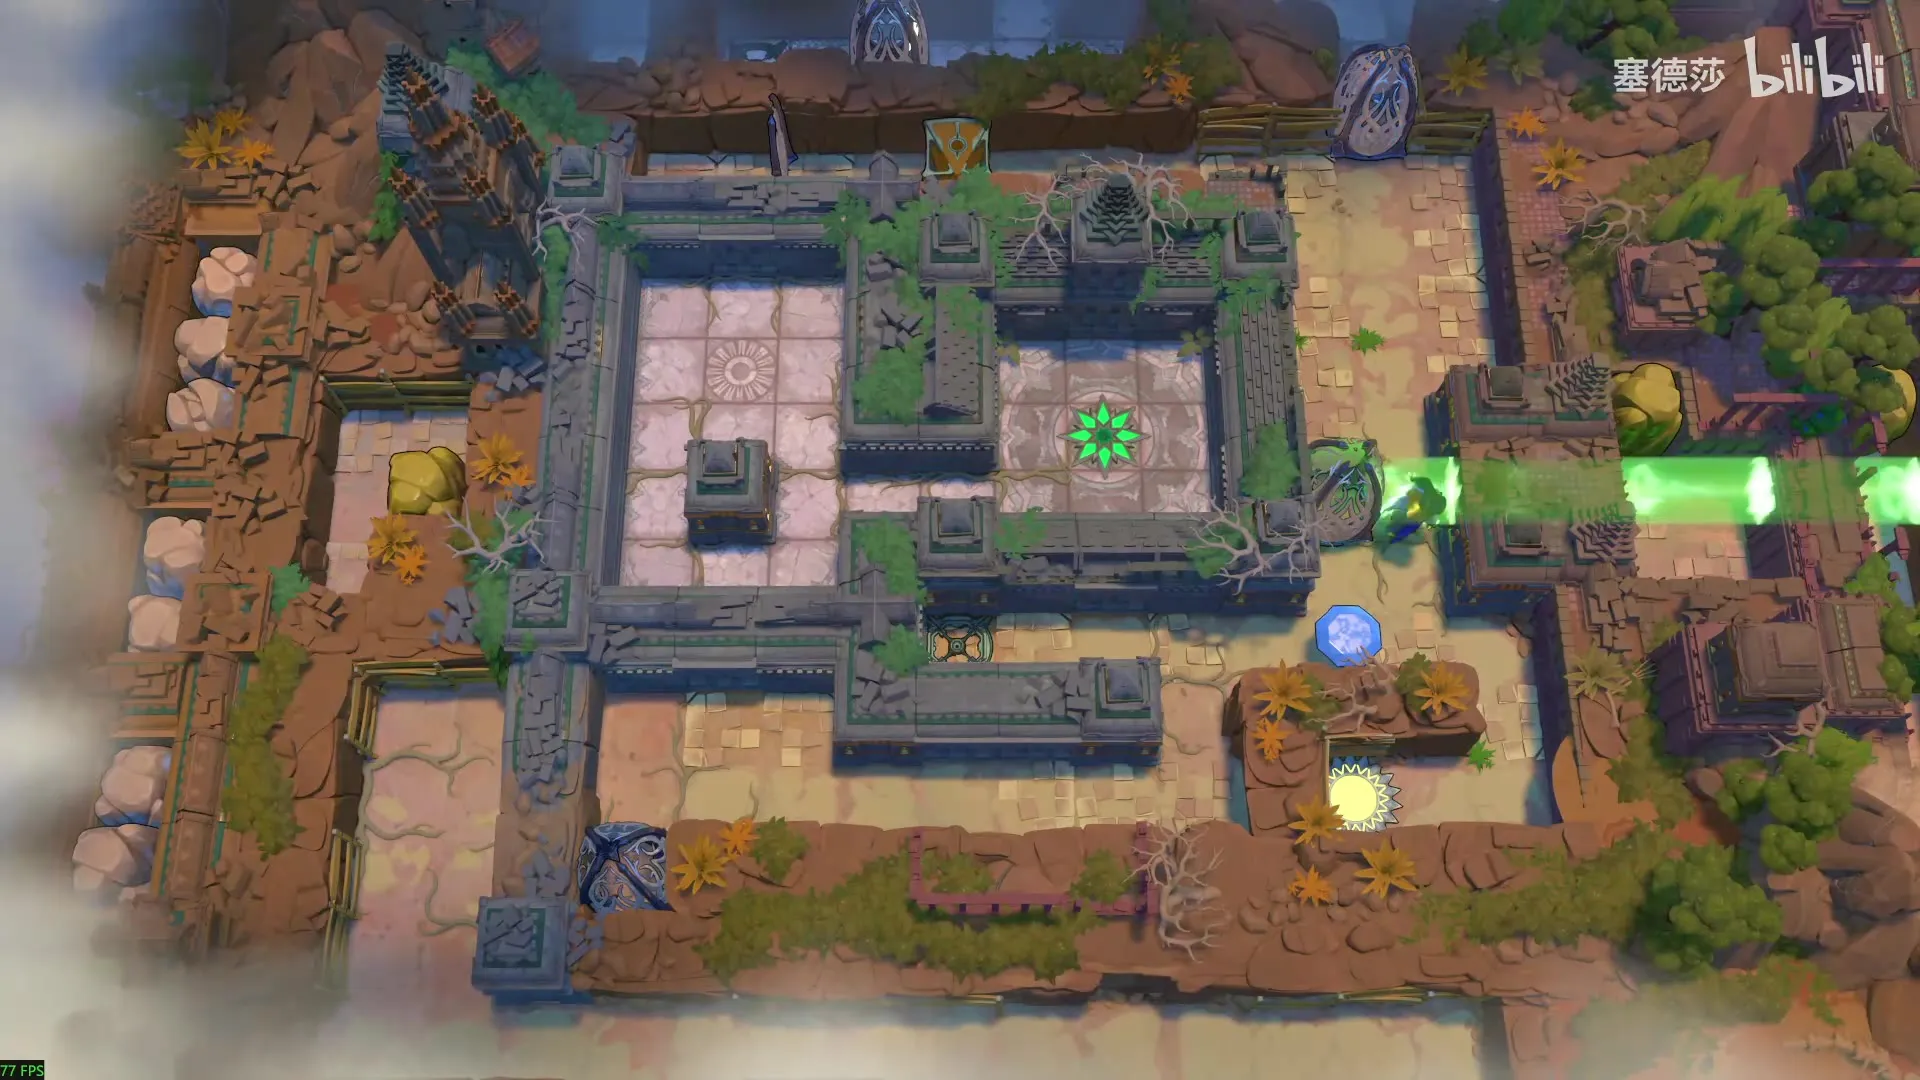
Before following the route
A light hint
The torc pickup is a mid-route checkpoint. It is followed by another section and a return through the earlier floor; do not stop the guide at the item dialogue.
What changes during this route
Use purple-beam travel to reach disconnected pockets. After collecting the torc, turn the named caster until its beam matches the pictured direction. A blue socketed gem is reusable power, not a loose pickup. Brief trial facings are omitted from the route.
Start from the matching pictured layout. A different save state may need a different preparation or recovery route.
-
1 Match the second exterior and enter
14:55–15:07Stage checkpointThe green caster points left. Time your passage around the moving blocker; do not try to rotate the caster yet.
-
1.1 Use the green room beside the entrance
Required layout · P8 14:57 Watch P8 · 14:55–15:07 ↗DoAfter the entrance conversation, put your available gem in the socket below the moving blocker. Enter the green light to pass the moving blocker and reach the right-hand caster and scroll. Return and retrieve the socket gem before going up the narrow passage.
Wait / checkThe green caster points left. Time your passage around the moving blocker; do not try to rotate the caster yet.
You should seeThe lower socket is empty again; you carry its gem into the purple room above.
-
-
2 Use the first purple beam and recover its gem
15:07–16:00Stage checkpointCheck that you arrive beside the caster before stepping left. The long pause in the recording is not a required wait.
-
2.1 Power the first purple caster
Required layout · P8 15:20 Watch P8 · 15:07–15:38 ↗DoFollow the passage upward to the next room. Put a gem in the socket beside the lower end of the purple column and step into the beam on its left.
Wait / checkThe caster points down. The rock blocks the ordinary walk to the upper-left gem.
You should seeYou are standing in the purple column with the upper gem still visible.
-
2.2 Travel up the purple column and collect G2
Required layout · P8 15:45 Watch P8 · 15:38–16:00 ↗DoUse the purple-beam travel interaction from the lower end. At the upper end, step left to collect G2, then return to the lower socket and retrieve its gem.
Wait / checkCheck that you arrive beside the caster before stepping left. The long pause in the recording is not a required wait.
You should seeThe upper-left gem disappears; the purple beam is off when you leave.
-
-
3 Open the first red and purple branches
16:00–17:15Stage checkpointThe two lower rocks disappear; the separate rock above-left of the green line stays.
-
3.1 Power the central group from S3
Required layout · P8 16:24 Watch P8 · 16:00–16:25 ↗DoGo left from the entrance passage to the central group. Put a gem in S3 beside the red and green casters.
Wait / checkThe red line points up, green left, purple right and the left yellow caster down. Keep this shared socket powered during the next circuit.
You should seeThe lower red passage and the crossing green line are active.
-
3.2 Collect the gem beside the bottom purple caster
Required layout · P8 16:25 Watch P8 · 16:24–16:39 ↗DoGo down the right-hand corridor and power S4 in the lower recess. Use the upward purple line to reach the bottom caster and collect the gem beside it. Use the red line to clear the barrier on the return path.
Wait / checkThe bottom red barrier becomes an empty outline. Recover S4 after returning to its recess; leave S3 powered.
You should seeThe bottom loose gem is gone and the temporary purple column switches off.
-
3.3 Open the upper-left red gate from the green row
Required layout · P8 16:45 Watch P8 · 16:39–16:54 ↗DoReturn up to the paired sockets above the central group. Fill the right socket S5. Enter its green row, use the red crossing to pass the barrier on the left and collect the gem behind it.
Wait / checkThe right socket powers the left-facing green caster. The left socket belongs to the yellow caster below.
You should seeThe left red barrier is an empty outline and its gem has been collected.
-
3.4 Clear the two rocks below the left yellow caster
Required layout · P8 17:00 Watch P8 · 16:54–17:15 ↗DoRetrieve S5 and return to the yellow column on the left of S3. Enter the yellow line and clear the two rocks below it, then collect the gem underneath.
Wait / checkThe two lower rocks disappear; the separate rock above-left of the green line stays.
You should seeThe lower-left pocket is empty. Retrieve S3 before moving to the two central yellow rooms.
-
-
4 Use the central yellow cross
17:15–18:08Stage checkpointThe vertical yellow beam turns off, followed by the horizontal one.
-
4.1 Make the central yellow crossing
Required layout · P8 17:25 Watch P8 · 17:15–17:26 ↗DoFill the left socket of the upper pair, S6, and the socket beside the lower upward yellow caster, S7.
Wait / checkOne yellow line runs right from the upper room; the other runs up from the lower room. The shared red/green/purple group is off.
You should seeThe two yellow lines cross in the central corridor.
-
4.2 Clear the vertical pair above the yellow crossing
Required layout · P8 17:32 Watch P8 · 17:26–17:57 ↗DoWalk upward in the vertical yellow line and clear the two rocks stacked above the crossing. Collect the gem on the right side of the green caster below them.
Wait / checkBoth stacked rocks disappear. The top-left red barrier and its separate gem remain for later.
You should seeThe vertical corridor is open and the gem beside the green caster is gone.
-
4.3 Recover the two yellow-room gems
Required layout · P8 18:05 Watch P8 · 17:57–18:08 ↗DoReturn down to S7 and retrieve it, then return to S6 and retrieve that gem as well.
Wait / checkThe vertical yellow beam turns off, followed by the horizontal one.
You should seeBoth central yellow sockets are empty.
-
-
5 Connect the right red room and lower devices
18:08–18:58Stage checkpointThe gate beside the lower gem becomes an empty outline. Return up the right red column and recover S8.
-
5.1 Use yellow access to power the right red room
Required layout · P8 18:13 Watch P8 · 18:08–18:25 ↗DoTemporarily power S6 again to enter the horizontal yellow route. Go to the socket below-left of the right red caster and fill S8. Collect the loose gem above that caster.
Wait / checkThe red caster points down. Return and retrieve S6 once you have reached the open central corridor.
You should seeThe right red column remains on while the temporary yellow line is off.
-
5.2 Open the lower-right red gate and take its gem
Required layout · P8 18:50 Watch P8 · 18:25–18:58 ↗DoRestore S3 so the central purple and green routes are active. Travel along the horizontal purple row to the right red column, then use red access to clear the barrier beside the loose gem and collect it.
Wait / checkThe gate beside the lower gem becomes an empty outline. Return up the right red column and recover S8.
You should seeThe lower-right pickup is gone and the right red column is off.
-
-
6 Reach the upper branch and descend to the torc room
18:58–19:53Stage checkpointThe loose gem beside the top red gate must disappear. Then recover S9, S7, S4 and S3 before leaving this floor.
-
6.1 Bring purple, red and yellow into the top corridor
Required layout · P8 19:22 Watch P8 · 18:58–19:25 ↗DoPower the bottom purple socket S4 again. Use its upward line to reach the upper corridor, then fill the socket above the left-facing yellow caster. Keep S3 powered for red access.
Wait / checkAt the top, the red column is beside the red gate and the yellow row points left across the pair of rocks.
You should seeThe top pocket can be approached with the required beams available.
-
6.2 Clear the top pocket and recover the temporary power
Required layout · P8 19:28 Watch P8 · 19:25–19:53 ↗DoRestore the lower upward yellow line from S7 to clear the remaining rocks in the top pocket. Use the red crossing to open the top barrier and collect its gem.
Wait / checkThe loose gem beside the top red gate must disappear. Then recover S9, S7, S4 and S3 before leaving this floor.
You should seeThe top pocket is cleared and the source returns through the central floor tile with the beams off.
-
-
7 Collect the torc and check the pickup
19:53–20:28Stage checkpointThe gold-coloured item must disappear from the tiled alcove. Rotation instructions begin only after this pickup.
-
7.1 Fill the L-shaped sockets to open the exit
Required layout · P8 20:00 Watch P8 · 19:53–20:10 ↗DoOn the next floor, fill the sockets along the left and bottom edges of the red-caster chamber. Enter the right-facing red beam and clear the barrier at its right edge.
Wait / checkEvery socket in the L must be filled for the red caster to light. Leave the chamber through the opened right-hand gate.
You should seeThe red barrier becomes an empty outline.
-
7.2 Collect the torc in the green room
Required layout · P8 20:15 Watch P8 · 20:10–20:28 ↗DoPut a gem in the socket above-right of the green caster. Enter the green strip and reach the tiled alcove above it to collect the torc.
Wait / checkThe gold-coloured item must disappear from the tiled alcove. Rotation instructions begin only after this pickup.
You should seeThe torc pickup is shown and caster rotation becomes available.
-
-
8 Reorient the red device in the next chamber
20:28–21:40Stage checkpointThe right corridor barrier is now an empty red outline. Recover the purple socket after returning to the walking corridor.
-
8.1 Turn the next red caster upward
Required layout · P8 20:58 Watch P8 · 20:28–21:05 ↗DoEnter the room to the right of the torc alcove. Use the torc on its red caster until it points up toward the barrier, then enter that red line and clear the barrier.
Wait / checkThe source demonstrates several other facings first; the required exit-facing state is up. Do not move the caster out of its tile.
You should seeThe upper barrier opens and the corridor above is reachable.
-
8.2 Use the upper purple caster and clear the right corridor
Required layout · P8 21:28 Watch P8 · 21:05–21:40 ↗DoFill the socket at the lower-left of the upper purple room. Reach the purple caster along the horizontal beam, then turn it downward for the vertical return to the green room.
Wait / checkThe right corridor barrier is now an empty red outline. Recover the purple socket after returning to the walking corridor.
You should seeThe upper purple room is off and you are back below it.
-
-
9 Reclaim the lower socket line and use yellow
21:40–22:48Stage checkpointThe horizontal yellow line continues across the map wrap. Match the gold floor and the long lower corridor, not the screen edge.
-
9.1 Re-power the L and turn its red caster up
Required layout · P8 22:00 Watch P8 · 21:40–22:10 ↗DoRecover the green-room gem after returning. Fill the remaining empty socket in the L-shaped row, then turn its red caster upward. Follow the red column and clear the barrier to the left of the central floor tile.
Wait / checkThe L-shaped row must be complete. The red beam runs up beside the central tile.
You should seeThe left corridor is open; recover the L-shaped socket gems again.
-
9.2 Point the left yellow caster down
Required layout · P8 22:18 Watch P8 · 22:10–22:23 ↗DoFollow the opened left passage. Fill the socket beside the yellow caster and turn that caster down toward the lower room.
Wait / checkLeave the lower yellow caster for the return circuit. The downward line reveals the lower-left room.
You should seeThe route down the left edge is visible.
-
9.3 Turn the same yellow caster left and take the gold-room pickup
Required layout · P8 22:28 Watch P8 · 22:23–22:48 ↗DoReturn to the powered yellow caster and turn it left. Follow the opened outer corridor around to the gold-floored room on the far right and collect its item.
Wait / checkThe horizontal yellow line continues across the map wrap. Match the gold floor and the long lower corridor, not the screen edge.
You should seeThe gold-floor pickup disappears; return and recover S12.
-
-
10 Turn yellow toward the middle and work the purple branch
22:48–24:23Stage checkpointThe yellow line reaches the enclosed room from the left. The purple caster changes facing during entry and exit; check the alcove is empty before recovering power.
-
10.1 Power the lower-left room and turn its caster up
Required layout · P8 23:15 Watch P8 · 22:48–23:22 ↗DoFill the socket at the upper-left of the lower yellow room. Turn its yellow caster upward so the beam follows the left corridor.
Wait / checkThe loose gem beside this caster is still present at this point. Keep this socket powered while visiting the yellow rooms above.
You should seeA vertical yellow line is available along the left side.
-
10.2 Align the two yellow rooms before taking the lower gem
Required layout · P8 23:40 Watch P8 · 23:22–23:50 ↗DoPower the yellow room above the central passage from S14 and turn its caster down. Return to the lower yellow caster, collect the loose gem beside it and recover S13.
Wait / checkThe upper downward beam and lower upward beam occupy neighbouring columns. Do not copy the brief trial facings in between.
You should seeThe lower-left loose gem is gone and its socket is empty.
-
10.3 Turn yellow right to reach the enclosed purple room
Required layout · P8 24:05 Watch P8 · 23:50–24:23 ↗DoReturn to S14 and turn its yellow caster right. Fill the purple-room socket below the enclosure. Use the purple caster to reach the small alcove and collect its loose gem, then recover the purple socket and S14.
Wait / checkThe yellow line reaches the enclosed room from the left. The purple caster changes facing during entry and exit; check the alcove is empty before recovering power.
You should seeThe enclosed gem is gone and both temporary sockets are empty.
-
-
11 Clear the upper purple and green rooms
24:23–25:35Stage checkpointThis is the original torc room, identified by its pale tiled alcove and two rocks. Leave this beam active while returning upstairs.
-
11.1 Power the two upper purple rooms
Required layout · P8 24:25 Watch P8 · 24:23–24:43 ↗DoFollow the corridor up to the pair of sockets between the upper purple rooms. Fill both, then turn the right-hand purple caster right to reach the loose gem beneath its row.
Wait / checkThe left purple caster points right across the top row. The right caster must point right for the short row above the gem.
You should seeThe loose gem below the right caster is collected.
-
11.2 Return from the upper purple pocket
Required layout · P8 24:45 Watch P8 · 24:43–24:55 ↗DoTurn the right purple caster left for the return, then retrieve both sockets in the paired row.
Wait / checkThe two purple rooms go dark. The gem alcove below the right caster is empty.
You should seeYou are back on the corridor below, with both temporary gems recovered.
-
11.3 Power the upper green room and point it right
Required layout · P8 25:25 Watch P8 · 24:55–25:28 ↗DoGo right to the green room above the gold floor. Fill its socket and turn the green caster right, across the upper red room.
Wait / checkThe recording tries an upward facing before settling on right. Use the horizontal row shown here. Keep this socket powered.
You should seeThe green beam crosses above the red caster in the next room.
-
11.4 Keep the lower green caster pointing down
Required layout · P8 25:35 Watch P8 · 25:20–25:35 ↗DoReturn to the torc room below the gold floor. Power its socket and turn the green caster down.
Wait / checkThis is the original torc room, identified by its pale tiled alcove and two rocks. Leave this beam active while returning upstairs.
You should seeThe lower green column is active along the map wrap.
-
-
12 Begin the return circuit through green and red
25:35–27:03Stage checkpointThe target is the gem in the rock cluster immediately left of the gold floor. Do not clear or relocate all of those rocks.
-
12.1 Turn the upper-right red caster down
Required layout · P8 26:02 Watch P8 · 25:35–26:08 ↗DoReturn through the upper green row to the red room above the gold floor. Fill its socket and turn the red caster down. Enter the red line to clear the barrier beside the loose gem.
Wait / checkThe barrier below-right of the caster becomes an empty outline. Other trial facings in the recording are unnecessary.
You should seeThe loose gem to the right of the opened barrier can be collected.
-
12.2 Turn upper green down to enter the rock pocket
Required layout · P8 26:45 Watch P8 · 26:08–27:03 ↗DoRecover the red-room socket. Return to the upper green caster, turn it down and use its green column to reach the gem surrounded by rocks below. Keep the lower green room powered until you have returned.
Wait / checkThe target is the gem in the rock cluster immediately left of the gold floor. Do not clear or relocate all of those rocks.
You should seeThe rock-cluster gem disappears. Recover the two green-room sockets before leaving this floor.
-
-
13 Revisit the upper yellow and purple arrangement
27:03–28:43Stage checkpointLeave S22 powered. The short purple row stops at the alcove beside the right gem.
-
13.1 Revisit the first floor with the torc
Required layout · P8 27:10 Watch P8 · 27:03–27:25 ↗DoReturn through the central floor tile. Power the red room on the right from S8 and turn its caster right to open the upper red barrier. The new upper room opens; leave its lower loose gem for the later powered route, then recover S8.
Wait / checkThe upper barrier is an empty outline; the room above contains separate yellow and purple casters.
You should seeThe upper purple-coloured room is accessible.
-
13.2 Turn the old top yellow caster right
Required layout · P8 27:30 Watch P8 · 27:25–27:35 ↗DoGo to the yellow caster at the top of the old central corridor. Power its socket S9 and turn it right toward the new upper room.
Wait / checkThe yellow line reaches the loose gem and rock on the left side of the new room. Keep S9 powered.
You should seeA yellow entry line reaches the new upper room from the left.
-
13.3 Restore the lower shared circuit and the new green room
Required layout · P8 27:42 Watch P8 · 27:35–27:45 ↗DoFill S3 again to restore its four-caster group. Power the new socket below-left of the green caster above the entrance room and turn that green caster right.
Wait / checkThe upper red line, left yellow column and horizontal purple row are active. The new green row crosses above the entrance room.
You should seeThe return circuit is powered for the upper-room pickups.
-
13.4 Use the new yellow caster to clear its left pocket
Required layout · P8 27:55 Watch P8 · 27:45–28:12 ↗DoEnter the new upper room. Fill the socket below-left of its yellow caster and turn that caster left toward the old yellow line. Clear the rock in that row and collect the left loose gem.
Wait / checkThe two yellow casters face each other across the same row. The left pocket gem disappears.
You should seeThe left side of the upper room is clear.
-
13.5 Set yellow and purple downward for the lower pickup
Required layout · P8 28:20 Watch P8 · 28:12–28:33 ↗DoTurn the old top yellow caster down, and turn the new yellow caster down. Fill the new purple-room socket and turn its caster down beside the yellow column. Use the crossing to collect the lower loose gem in this upper room.
Wait / checkThe new purple and yellow columns are side by side. Keep S3 and the green return row powered.
You should seeThe lower loose gem in the purple-coloured room is gone.
-
13.6 Turn purple right toward the final upper gem
Required layout · P8 28:35 Watch P8 · 28:33–28:43 ↗DoRecover the new yellow-room gem from S21. Turn the new purple caster right toward the gem in its right alcove.
Wait / checkLeave S22 powered. The short purple row stops at the alcove beside the right gem.
You should seeThe upper right-facing purple line is ready for the return from below.
-
-
14 Finish the lower return circuit
28:43–30:33Stage checkpointThe small red barrier below the horizontal purple row becomes an empty outline. The gem on its left disappears.
-
14.1 Restore the entrance-side purple and green rooms
Required layout · P8 28:50 Watch P8 · 28:43–28:58 ↗DoGo down to the first purple room and power S2 again. Continue down to the first green room, power S1 and turn its green caster down. Use the purple column and green crossing to return to the upper-right gem alcove.
Wait / checkThese are the first two rooms of the vault. Their sockets sit beneath the narrow purple room and below the moving blocker. The green column wraps upward beside the upper-right gem alcove.
You should seeThe entrance-side purple and green lines are active for the return.
-
14.2 Collect the upper-right gem and recover its socket
Required layout · P8 28:54 Watch P8 · 28:58–29:13 ↗DoUse the powered return to reach the right-facing purple line in the upper room. Collect the gem at its right end, then return to S22 and retrieve it.
Wait / checkThe upper-right loose gem must disappear. The purple line goes dark when S22 is recovered.
You should seeBoth upper-room gem pockets are empty.
-
14.3 Turn the left yellow caster toward the purple room
Required layout · P8 29:45 Watch P8 · 29:13–29:48 ↗DoReturn to the left yellow caster in the S3 group. Use the torc until it points left into the first purple room. Turn that purple caster right so its row meets the yellow line.
Wait / checkThe recording tries several facings. Use the final horizontal yellow row across the top of the small purple room.
You should seeYou can work from the yellow crossing at the entrance-side room.
-
14.4 Turn the lower green caster up toward the rock cluster
Required layout · P8 29:55 Watch P8 · 29:48–30:12 ↗DoKeep the horizontal yellow route available. Turn the entrance-side green caster up, so its column reaches the rock cluster beside the old upper red gate. Collect the gem inside that cluster.
Wait / checkMatch the cluster immediately left of the old upper red gate. The surrounding rocks stay in place; collect the central gem through the green access.
You should seeThe cluster gem disappears. Recover the first purple-room socket after returning.
-
14.5 Finish the red-gated pocket below the shared group
Required layout · P8 30:28 Watch P8 · 30:12–30:33 ↗DoKeep S3 powered. Turn the newer green caster above the entrance left so its beam crosses the red column, then reach the red barrier in the recess below S3 and collect the gem behind it.
Wait / checkThe small red barrier below the horizontal purple row becomes an empty outline. The gem on its left disappears.
You should seeThe final lower pocket is empty.
-
-
15 Confirm the entrance-room interaction and exit
30:33–31:21Stage checkpointUse the visible portal as the completion cue. The earlier dialogue alone is not proof of completion.
-
15.1 Recover the remaining power gems and return to the entrance
Required layout · P8 30:38 Watch P8 · 30:33–30:45 ↗DoTake back the gems from the shared central socket and the remaining powered return rooms, including S9, S20 and S1. Go back to the creature in the entrance chamber.
Wait / checkThe red, yellow, purple and green return lines are off before the final interaction. Check for any blue gem still sitting in a powered socket.
You should seeYou are back with the entrance creature carrying the recovered gems.
-
15.2 Give the recovered gems to the entrance creature
Completion cue · P8 31:05 Watch P8 · 30:45–31:21 ↗DoInteract with the creature in the starting tiled room and continue the gem-giving interaction until the portal appears.
Wait / checkUse the visible portal as the completion cue. The earlier dialogue alone is not proof of completion.
You should seeA coloured portal appears beside the creature in the recorded ending.
-
Check the observed outcome
Recover the remaining socketed gems and return to the entrance creature. The interaction at 30:45–31:10 produces a visible transformation and lit exit effect, followed by the exterior transition. Dialogue alone is not the completion cue.
Sources
Updated 2026-10-15. Version limits are noted beside the advice they affect.